
Did you receive a font file that is part of the customer’s visual identity but is not available in Google Fonts? calm! In this comprehensive guide, I’ll show you how to solve this classic web development problem in a simple, practical way.
Problem: Custom fonts outside of Google Fonts
It’s a very common situation: the marketing department or client sends the official font of the brand, and when you check it is not available on google fonts To be linked directly to the project. And now? How to use this font on the website?
The good news is that there are several ways to add custom fonts to your projects, whether you’re working with pure code, WordPress Gutenberg, or Elementor. I will show them all!
Solution 1: Add custom fonts to pure code projects (HTML/CSS)

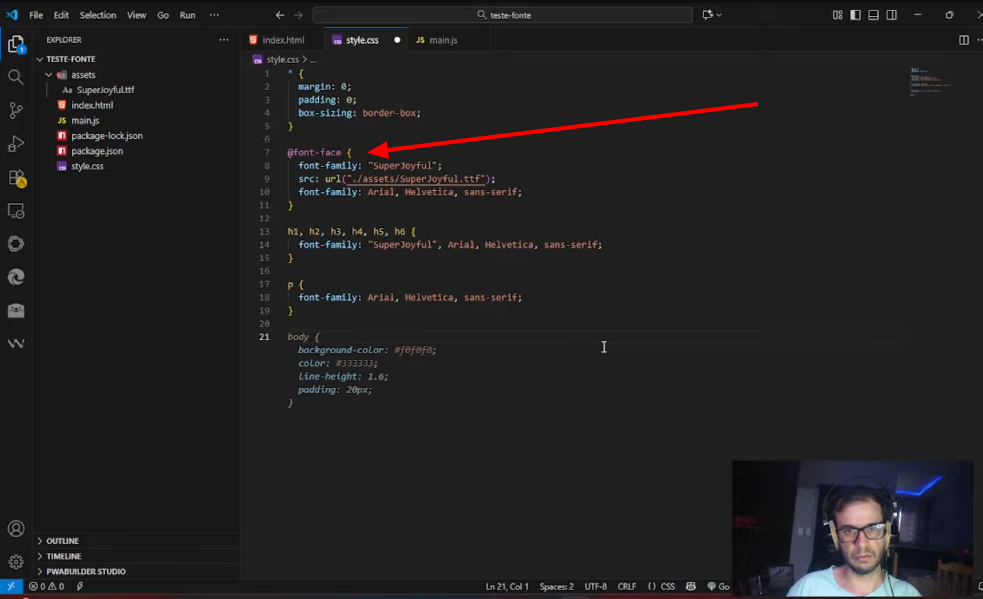
For projects developed using pure code, the process is very straightforward. You will use the rule @font-face In CSS to import the font.
Step by step:
1. Organizing font files
- Create a folder called
fontsorassets/fontsIn your project - Place font files (.ttf, .woff, .woff2, .otf) in this folder
2. Configure the CSS Add the following code to your main CSS file:
@font-face {
  font-family: 'NomeDaFonte';
  src: url('fonts/nome-da-fonte.woff2') format('woff2'),
       url('fonts/nome-da-fonte.woff') format('woff'),
       url('fonts/nome-da-fonte.ttf') format('truetype');
  font-weight: normal;
  font-style: normal;
}
3. Use font in elements You can now apply the font to any element:
h1, h2, h3 {
  font-family: 'NomeDaFonte', sans-serif;
}

p {
  font-family: 'NomeDaFonte', Arial, sans-serif;
}
Pro Tip:
Always include a fallback font (such as Arial or sans-serif) in case your custom font doesn’t load for some reason.
Solution 2: Custom Fonts in WordPress Gutenberg (FSE)

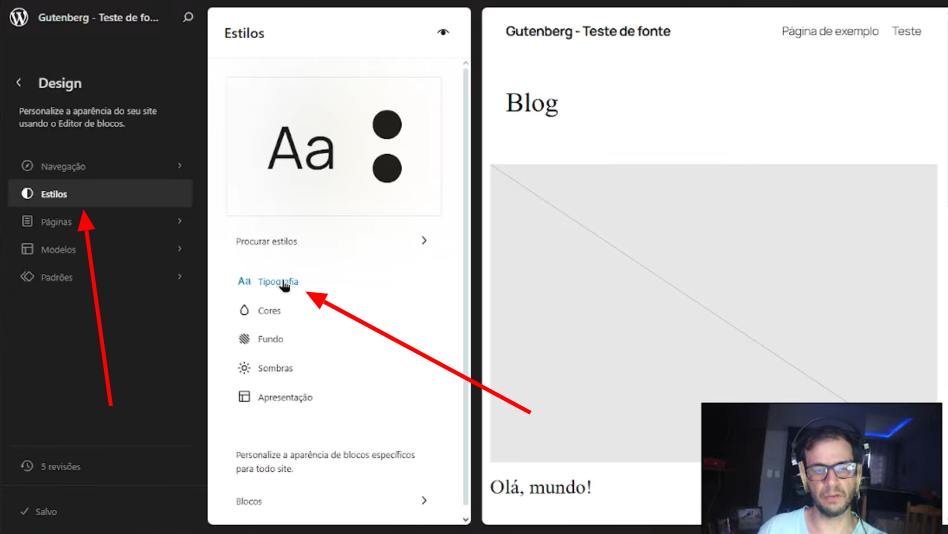
For those who work with WordPress and use the Gutenberg editor, the best option is to use FSE (Full Site Edit) themes. These themes have no editing restrictions and allow you to add custom fonts locally.
How to do:
1. Access the site editor
- In your WordPress dashboard, go to Appearance > Editor
2. Print configuration
- Click on Styles (brush icon)
- Access the printing section
- Click “Manage Font Families”
3. Add the custom font
- Click “Add Source”
- Download font files
- Configure variables (weight and style)
4. Applies to items
- Set the font for headings, paragraphs, and other elements
- Save changes
Non-FSE subjects?
If you are using a traditional WordPress theme (non-FSE), I recommend using the plugin Fonts pluginwhich I will explain later in the solution for Elementor Free.
Solution 3: Custom fonts in Elementor PRO

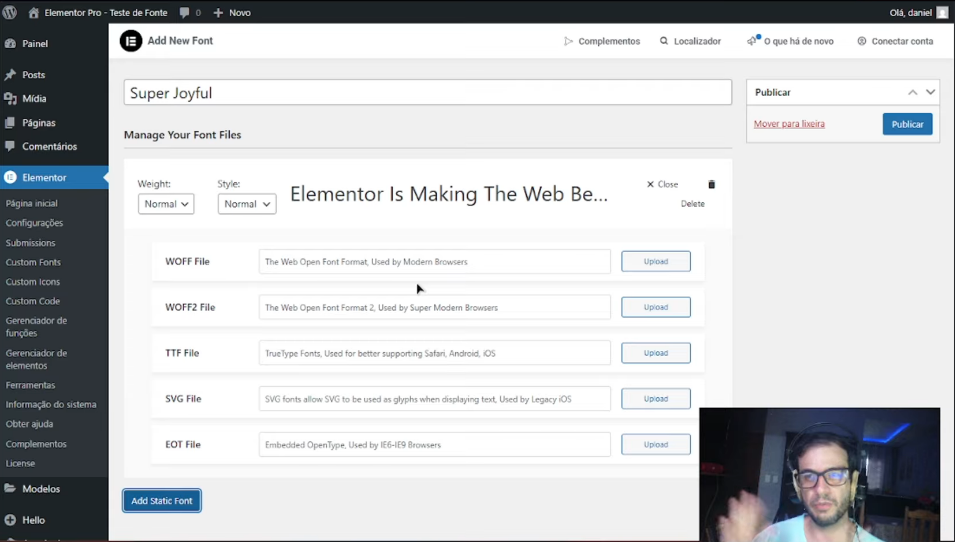
Elementor PRO offers a native functionality called Custom fontswhich makes the process very simple.
Step by step:
1. Access to custom fonts
- In your WordPress dashboard, go to Elementor > Custom Fonts
2. Add a new line
- Click “Add New”
- Give a name to identify the source
3. Upload the files
- Add font files (.woff, .woff2, .ttf, .otf)
- Configure the line thickness if necessary
- Save changes
4. Do not use any ingredient
- Open any page in Elementor
- Select the text element
- In the Typography section, the custom font will be available in the list
ready! You can now use the font on any element in Elementor.
Solution 4: Custom Fonts in Elementor Free

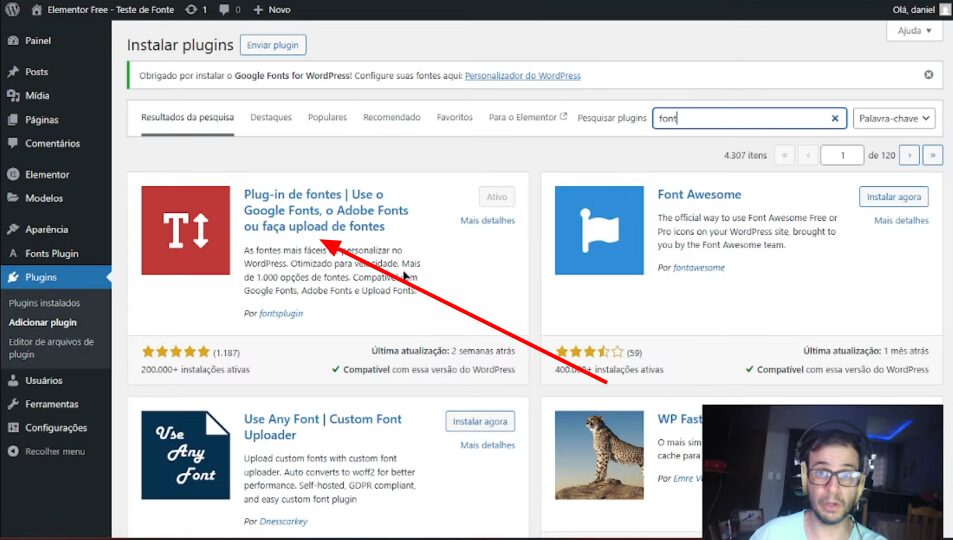
If you are using the free version of Elementor, you will not have access to the custom fonts functionality. But there is an excellent solution: a plugin Fonts plugin.
How to use the Fonts plugin:
1. Install the plugin
- In your WordPress dashboard, go to Plugins > Add New
- Search for “Fonts Plugin” or “Custom Fonts”
- Install and activate the plugin
2. Configure the font
- Access the plugin menu
- Click “Add Font”
- Download font files
- Configure name and properties
3. Do not use any free item
- The font will automatically be available in Elementor
- Select any text element
- Choose your custom font from the Print menu
Bonus: Use it on Gutenberg too!
The font plugin also works perfectly with Gutenberg, making it a great alternative to non-FSE WordPress themes.
Font Formats: Which One to Use?
There are different file formats for web fonts. Here is a summary:
- WOFF2:More modern format, compact size, better performance
- WOFF: Good compatibility with old browsers
- Funds/OTF: Traditional formats, larger file size
- Equal Opportunity Court: For old Internet Explorer (rarely needed today)
recommendation:
Use WOFF2 as the first option and include WOFF as a fallback option to ensure maximum compatibility.
Best practices for performance
When adding custom fonts, keep these tips in mind to maintain site performance:
1. Optimize loading
- Use only the line weights you really need
- Prefer WOFF2 for smaller files
- Consider using
font-display: swappara evitar FOIT (Flash Invisible Text)
2. Host locally
- Hosting fonts on your own server improves privacy
- Reduces external dependencies
- Improves GDPR compliance
3. Subsets of characters
- If possible, use only necessary characters
- This significantly reduces file sizes
Final Checklist: Custom Fonts
Before finishing your project, check the following:
- ( ) Do you have legal permission to use the font in the project?
- ( ) Are the files in the correct format (WOFF2, WOFF)?
- ( ) Does the font load correctly in all browsers?
- ( ) Have you selected the appropriate backup lines?
- ( ) Does the site continue to perform well after adding fonts?
- ( ) Is the font applied to all required elements?
Conclusion: Custom fonts are no longer a problem
As you’ve seen, adding custom fonts to your web projects doesn’t have to be complicated. Whether you’re working with pure code, WordPress Gutenberg or Elementor (free or PRO), there’s always a practical and efficient solution.
The important thing is to choose the right method for your project and follow good performance practices to ensure your site continues to load quickly.
Watch the full video tutorial
Want to see all this in practice? I watched the full video on the Suprema UX channel, where I show each of these solutions in action step by step:
👉 Click here to watch on YouTube
What’s your next bring?
Tell us in the comments of the video or here on the blog: What’s an everyday development problem you’d like to solve in the next episode of the Solve the Linings series?
About the author: Daniel Carvalho is a content creator on the Suprema UX channel, where he shares practical solutions for web developers and designers. Specialized in WordPress, Elementor, and front-end development.
 treat healthcare content differently and what does it mean for your SEO?
Z News")

